


Table Of Contents
To improve the load time from the previous article, we must look to caching. I have always been fascinated by technology that allows us to serve pages very VERY fast. So in this article, I am going to explore a few different options for making Wordpress load faster using caching.
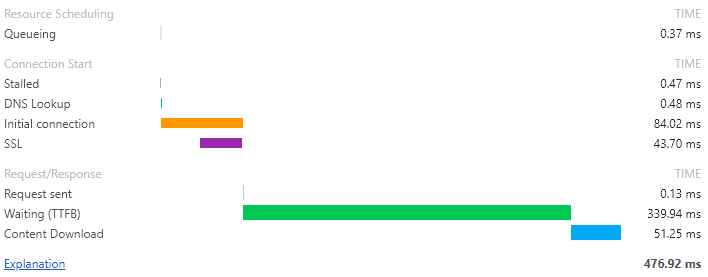
It is not feasible to make software like Wordpress load in less than 100ms, just loading the front page on this blog takes around 400ms which is already fast for a Wordpress site. So we need a caching system in front of it to improve the load time.
In many cases, the pages your users see are 100% identical. They may contain dynamic content that changes if the user logs in, or adds a product to a cart. But most of the site is identical from user to user and page load to page load.
For most websites, the website software constructs the page from scratch on every page request, over and over again. It puts extra load on the servers and database for no added value.
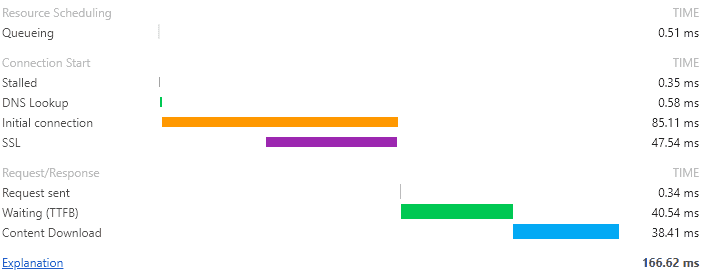
For example, for a simple blog like this page, it takes around 400ms to generate the front page, for every visit. If we somehow could save this page and only generate it once in a while, then we can both serve the page fast, and put less stress on our servers. Using caching, the load time on this blog dropped to below 100ms for a page view.
Frontpage load without caching
With caching
And finally when the user browses the site and has a connection that is kept alive.
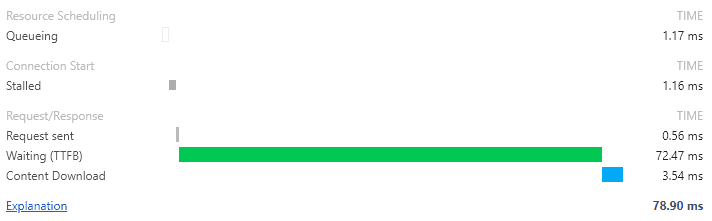
This load time gives the user the feeling of instant response which is important from a usability standpoint. And we all like a snappy website
How to set up caching?
Setting up caching is at least a two-step process.
- The web system, in this case, Wordpress, needs to have caching enabled
- A caching layer/system needs to be available
What is caching?
This section gets a bit technical, so feel free to skip to the next section.
When a webpage is generated and sent to a browser, hidden “headers” are added to allow the server to explain extra things to the browser. An example is shown here:
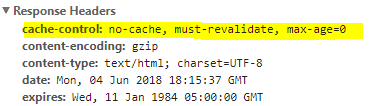
Headers can tell the browser many things, the part to focus on here is the cache-control header, marked with yellow. This explains, in more or less plain English, that the browser must not cache the page, if the user requests the same page again, it must ask the server for a new and updated copy.
It requires the server to run all the generation code again to produce the same result. What a waste!
But we can explain to the browser that if the user requests the page again, then it is allowed to reuse the copy it already got, for a fixed amount of time. As shown here:
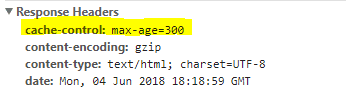
Now the browser is allowed to cache the page for 300 seconds(5minutes). If the user, when browsing the site, returns to the same page again, the load time will be much faster since the browser uses a local copy of the page and does not ask the server for an updated version.
The downside is of course that if you made any changes to the page, the user would experience a delay of up to 5minutes before they see the change. Usually, that is not a problem.
There are many different ways to tell the browser how to cache a page. But for now, we will stick with just a simple timeout.
Enabling caching in Wordpress
As with everything, there is a module for Wordpress that does what we need. It is called Cache-Control. When this is installed it will automatically add cache headers to the pages, and it has excellent default settings so you should not have problems with it. More documentation for the module exists here.
How can we utilize a cache?
In the example above Wordpress will communicate directly with the browser, and the browser does the caching. So if the same user requests a page multiple times, it will be fast. But if another user visits the page, the server needs to generate the page for that user as well.
The cache is per user and not global. To make the cache global an extra layer in front of Wordpress is needed. The different options for this layer will be explored in the next section.
Cache-headers is a global standard for caching, meaning that all caching software will understand them. This allows great freedom to select from many different options for caching.
When using a cache this way we will get a setup like shown here:
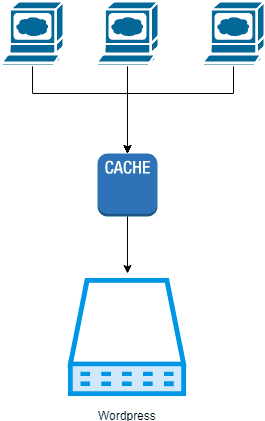
All requests from the users will go through the caching system. Which allows the cache to decide if it can serve the request or if it needs to contact Wordpress to make it generate the requested page.
Which caches exist?
Many different options exist from fully managed plug & play solutions to roll your own setup. Prices also vary a lot. I have researched different options below and had a few thoughts about each.
A few possible options
- Varnish Cache
- Nginx
- CloudFlare
- CloudFront
- MaxCDN
- And many others
Varnish Cache
This software has always intrigued me, it is blazing fast and has an extensive feature set. You can find it here. They also have a managed solution here.
The killer feature for me is that they support cache tags and invalidation. For example, if you have a page that consists of different elements like, a header latest five blog posts, feature blog post, and a footer. The page still only have a single URL like https://datadriven-investment.com/frontpage, but Varnish allows us to add four cache tags to the page, one for each element. When one of the elements expires, the backend system can tell Varnish to delete all cached pages where the element is featured, making it much easier to serve up-to-date content to users.
One large problem I have with Varnish is that they do not support SSL-termination I do understand the reason for it and partially agree with it. But it will complicate the setup to have an extra component in front of Varnish to do the termination.
Nginx
Nginx is a swiss army knife of features. So, of course, it is also able to handle caching. Using Nginx for caching allows us to reuse an existing component in the architecture. Plus we do not need to learn yet another technology.
As described by Rahul here, it might be better to learn more about Nginx than trying to master multiple technologies, from time spent/value perspective.
Setting up caching with Nginx is quite easy, just tell it where to save the cache and how to expire files in it, like this:
http {proxy_cache_path /cache levels=1:2 keys_zone=my_cache:10m max_size=10ginactive=60m use_temp_path=off;# the rest of the setup is skipped for brewity}
This specifies that the cache is placed in /cache and is a folder structure that is two levels deep. It must not be more than 10GB in total, and all elements that are not accessed for 60 minutes are deleted.
On the site, we tell it to use the cache
server {# the rest of the setup is skipped for brewitylocation / {proxy_cache my_cache;add_header X-Proxy-Cache $upstream_cache_status;# the rest of the setup is skipped for brewity}}
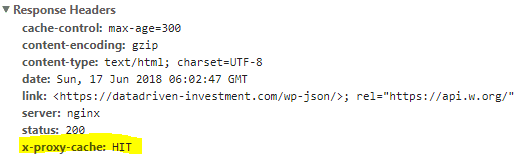
Then Nginx handles the rest. The add_header directive adds a header to each request so we can see if the request came from the cache or not.
A more detailed guide for setting up Nginx can be found here.
CloudFront
It is possible to add a custom domain name to a CloudFront distribution. If we change datadriven-investment.com to point to a CloudFront distribution, then it will work as a caching proxy.
The cool thing about using CloudFront is that we can use the infrastructure provided by Amazon, there are Edge servers all over the world, and when a user requests a page, it will contact the server that is closest.
The pricing is also competitive at around $0.085 per GB currently. I chose not to use this for caching pages because I wanted to improve my understanding of caching with a system that has more features than CloudFront provides.
Cache system
To make my tech-stack as simple as possible I use Nginx for caching; this allows me to reuse the same server as I already use for SSL-termination.
I’m quite sure that I would be able to see a drop in serverload as well. But since I currently do not monitor it, then I can not see for sure.
Tags
Share

Related Posts
Legal Stuff