


Table Of Contents
There are many reasons for running a website on HTTPS instead of the regular HTTP. One reason is that Google Chrome soon will start to mark HTTP sites as insecure, possibly spooking your visitors. It is also a signal to your visitors that the communication between them and your website is protected.
In this article, I will describe how to set up Let’s Encrypt which provides free HTTPS certificates. It is part of a continuous effort to make the setup, described in the earlier articles, best-practice. I also offer some background information about HTTPS certificates for the interested reader.
How does an HTTPS certificate get issued
Upgrading HTTP to HTTPS requires an encryption certificate. A certificate consists of two parts, a private and a public part, more details here. The certificate is provided by a Certificate Authority (CA). There are many different CAs in the world. Like Comodo, Symantec, GoDaddy and many more. Each CA is capable of issuing a certificate, and the data will be encrypted equally well between your website and the user independent of which CA issued the certificate. You can even create your own CA to issue a certificate.
For a certificate to be accepted by the browser, the CA needs to be trusted by the browser. This trust is necessary because anyone can create their own CA and issue certificates for any domain on the internet. So a trust hierarchy is the only way to distinguish between trusted and untrusted certificates. It has lead to some problems like Symantec issuing certificates for domains to untrusted people. It is important to notice that this does not affect the encrypting quality but solely the trust part.
When a CA issues a certificate, they provide different levels of validation. Still, the encryption is the same, but it offers different levels of trust.
The most basic certificate, a domain validated certificate, is only validated by the website owner proving that he owns the domain, like placing a specific file on the web server or having his info in the whois service on the domain. This type of certificates gives a marking in the browser like this:
If more trust is needed, for example for a bank. A more high-level trust process can provide an Extended Validation Certificate(EV certificate). The process to get an EV certificate is more involved since the CA goes to greater lengths to validate that you are who you say to are. When an EV certificate is installed, you are rewarded with a marking in the browser like below, that shows your user that you are a trusted website:

The price differs a lot. From free, for a domain validated certificate, to $1000 a year for an EV certificate.
Let’s Encrypt certificates
Since CAs charge money for a certificate, it hinders uptake. To make a more significant push for HTTPS, Let’s Encrypt was founded with many industry sponsors. The goal of the project is to provide domain validated certificates for free. It was founded in 2016, and currently, they have issued more than 100 million certificates.
Getting a certificate is free and is a two-step process, that uses the ACME protocol.
- First, we must set up our web server to answer requests for the folder
<domain>/.well-known/acme-challenge/ - Then Let’s Encrypt provides a program that writes special files to this folder. It allows Let’s Encrypts server to fetch the files, and that proves that we have access to the server/domain. It allows Let’s Encrypt to establish trust and provide us the certificates.
All of this is handled by certbot which is provided to us by Let’s Encrypt. The process is a bit more involved than shown above, it is described in more details here.
Setting up Nginx and Docker to generate certificates
This part is highly dependent on the setup described earlier, with Docker swarm on AWS. So if nothing makes sense, please refer back to the earlier articles. The configuration used below is provided by C-Duv.
All HTTP requests hit the load balancer service as the first server. We are going to use this server as SSL terminator. All traffic inside our network is trusted and do not need to be HTTPS. Only traffic from the user’s browser to the load balancer is HTTPS.
Let’s Encrypt uses regular HTTP to validate trust. A few changes to Nginx on the load balancer is needed to allow access to the folder that Let’s Encrypt use. We use the local folder /var/lib/letsencrypt/datadriven-investment.com to be accessed by the URL datadriven-investment.com__/.well-known/acme-challenge/
# Rule for legitimate ACME Challenge requests (like /.well-known/acme-challenge/xxxxxxxxx)location ^~ /.well-known/acme-challenge/ {# No HTTP authenticationallow all;# Set correct content type. According to this:# https://community.letsencrypt.org/t/using-the-webroot-domain-verification-method/1445/29# Current specification requires "text/plain" or no content header at all.# It seems that "text/plain" is a safe option.default_type "text/plain";# Change document root: this path will be given to certbot as the# `-w` param of the webroot plugin.root /var/lib/letsencrypt/datadriven-investment.com;}# Hide /acme-challenge subdirectory and return 404 on all requests.# It is somewhat more secure than letting Nginx return 403.# Ending slash is important!location = .well-known/acme-challenge/ {return 404;}
It is added to the server{ } clause on the virtual host for the site in the Nginx config file.
Certbot creates the files to serve from the directory, but it does not run in the same Docker container as the load balancer, so we need to mount volumes so both containers can access the files. The volumes are added to the docker-composer.yml file as shown here:
version: "3.2"services:loadbalancer:image: 637345297332.dkr.ecr.eu-west-1.amazonaws.com/patch-loadbalancer:latestbuild: loadbalancerports:- target: 8080published: 80protocol: tcpmode: host- target: 443published: 443protocol: tcpmode: hostdeploy:placement:constraints:- node.role == managervolumes:- /etc/letsencrypt:/etc/letsencrypt- /var/lib/letsencrypt:/var/lib/letsencrypt
Now we can run the generate.sh script provided by C-Duv. Remember to update the parameters to match your site.
It should give the following output.
#./generate.shSaving debug log to /var/log/letsencrypt/letsencrypt.logPlugins selected: Authenticator webroot, Installer NoneObtaining a new certificatePerforming the following challenges:http-01 challenge for datadriven-investment.comUsing the webroot path /var/lib/letsencrypt/datadriven-investment.com for all unmatched domains.Waiting for verification...Cleaning up challengesIMPORTANT NOTES:- Congratulations! Your certificate and chain have been saved at:/etc/letsencrypt/live/datadriven-investment.com/fullchain.pemYour key file has been saved at:/etc/letsencrypt/live/datadriven-investment.com/privkey.pemYour cert will expire on 2018-08-03. To obtain a new or tweakedversion of this certificate in the future, simply run certbotagain. To non-interactively renew \*all\* of your certificates, run"certbot renew"- If you like Certbot, please consider supporting our work by:Donating to ISRG / Let's Encrypt: https://letsencrypt.org/donateDonating to EFF: https://eff.org/donate-le
Now the certificates have been generated, and we can add them to Nginx. It is done by using the ssl_certificate and ssl_certificate_key config variables:
server {listen 443 ssl;server_name datadriven-investment.com;ssl_certificate /etc/letsencrypt/live/datadriven-investment.com/fullchain.pem;ssl_certificate_key /etc/letsencrypt/live/datadriven-investment.com/privkey.pem;ssl_protocols TLSv1 TLSv1.1 TLSv1.2;ssl_ciphers HIGH:!aNULL:!MD5;location / {proxy_set_header Host $host;proxy_set_header X-Forwarded-For $remote_addr;proxy_set_header X-Forwarded-Proto $scheme;proxy_pass http://datadriven-investment-loadbalance;}# No acme ACME Challenge stuff here: Let's Encrypt API uses HTTP for validation}
Now Nginx will be able to handle HTTPS requests against the website. It might be a good idea to redirect all HTTP traffic to HTTPS automatically to provide the best user experience.
Website setup and HTTPS
A website that uses HTTPS must not request resources that are loaded by HTTP. If this happens, the browser will show the user that the website is not secure.
A few of the resources like gravatar avatars are loaded using HTTP. To avoid this Wordpress needs to know that the site is changed to HTTPS. It is done by changing the “Wordpress Address” and “Site Address” under settings to include https://
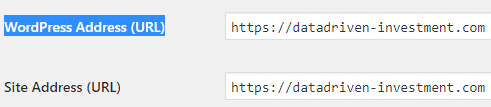
Other links might need be to change as well, but it depends on your Wordpress setup. When you see the “Secured” badge in Chrome HTTPS, it is working as expected.
Validate that the certificate setup
Many different standards exist for how the connection between the browser and server is handled, and how the certificate is used. Some of it requires additional configurations. SSLLabs.com can test your setup. It gives a B grade on this setup as it is now.
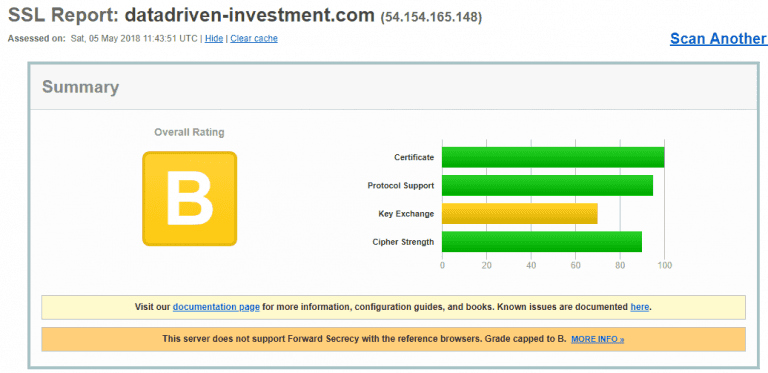
The problem is the missing Forward Secrecy support. It can in some cases cause an attacker to be able to decrypt the traffic, not a good situation. Luckily it is easy to add to Nginx as described here. Just add this configuration:
ssl_prefer_server_ciphers on;ssl_ciphers "EECDH+ECDSA+AESGCM EECDH+aRSA+AESGCM EECDH+ECDSA+SHA384 \\EECDH+ECDSA+SHA256 EECDH+aRSA+SHA384 EECDH+aRSA+SHA256 EECDH+aRSA+RC4 \\EECDH EDH+aRSA RC4 !aNULL !eNULL !LOW !3DES !MD5 !EXP !PSK !SRP !DSS !MEDIUM";
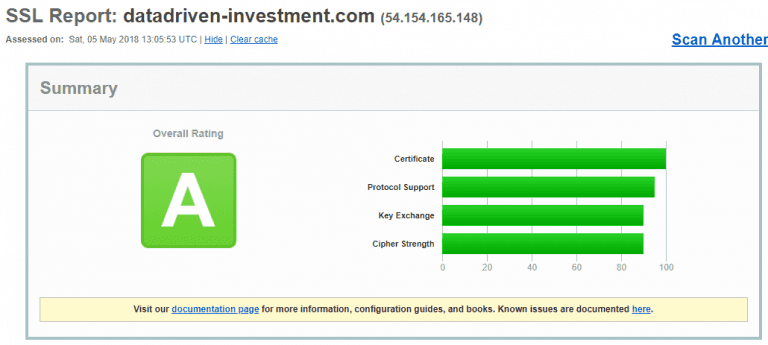
Now the setup gets an A grade.
Another extra security can optionally be added in DNS by using a CAA record. As described earlier every CA can issue a certificate for any domain on the Internet. So if an attacker were able to get a trusted certificate from a CA, it would allow him to impersonate our website.
To avoid it, a CAA DNS record allows us to specify which CA that are allowed to generate a certificate for our domain. When visiting the website, the browser can look up the information and only trust the certificate if it is from the correct CA.
A CAA record looks like this(Amazon Route53)

Performance with HTTPS
Switching from HTTP to HTTPS makes the connection from the browser to the web server to take more time. The handshake now includes some extra steps because of the certificate.
Much more detail is found here. In our case, it is obvious from the response tracing in Uptime Robot that the connection time is a bit slower.
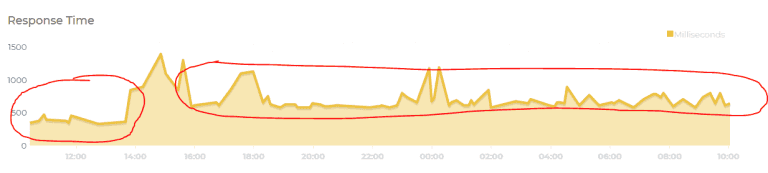
Around 250ms slower with HTTPS. In a later post I might look into HTTP/2 which might improve this, but for now, it is okay.
Renew certificates automatically
A thing to notice is that the certificates from Let’s Encrypt expire after three months. We do not want to renew the certificate by hand every time. Luckily for us, certbot provides a way to renew the certificate.
# Command to run periodicallydocker run --rm \--name letsencrypt \-v "/etc/letsencrypt:/etc/letsencrypt" \-v "/var/lib/letsencrypt:/var/lib/letsencrypt" \certbot/certbot:latest \renew --quiet --no-self-upgrade# Reload Nginxdocker kill -s HUP nginx
This script needs to be run on the same Docker host where the load-balancer service is running, so we add it to the monthly crontab.
It is yet another dependency when/if we need to run multiple load-balancers in the future. If a certificate expires, the site will not be allowed to load by the browsers. To make sure everything is smooth add a calendar notice in a month to make sure the renew works as expected :-)
Share

Related Posts
Legal Stuff