


Table Of Contents
In my continuous effort to make my setup as redundant as possible, the next step is to add a load balancer. I ran into a few problems while setting it up, allowing me to share my experience.
- It is not possible to have the apex record of a domain point to a CNAME.
- Moving the domain names of a service that runs HTTPS requires great care.
I added a network load balancer to sit in front of my Docker hosts to allow them to be fall over for each other. After that, I moved datadriven-investment.com to www.datadriven-investment.com because of the problem with apex DNS record mentioned above.
On AWS there are two options for load balancing. Application level or network level.
Using an application-level load balancer requires it to do the SSL termination as explained here. That is possible using an application level load balancer since it works on the HTTP level.
The other load balancing type is network level. It load-balance TCP traffic, without regard to which application is running across the connection.
SSL termination is handled by my Nginx server, and I do not want to change that, so I need a network load-balancer.
The setup currently looks like this:
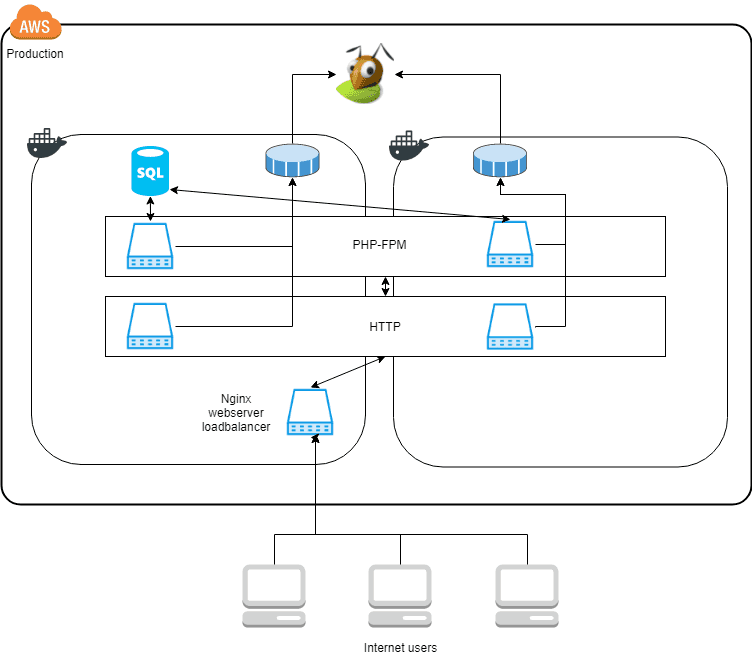
Here a static IP(Elastic IP) is bound directly to one of the docker hosts(the left docker square in the diagram). It creates a single point of failure. If this Docker host stops working no traffic will be processed, even if the other Docker host keeps working as expected.
A load balancer from AWS can amend this problem. So the architecture is transformed into this instead.
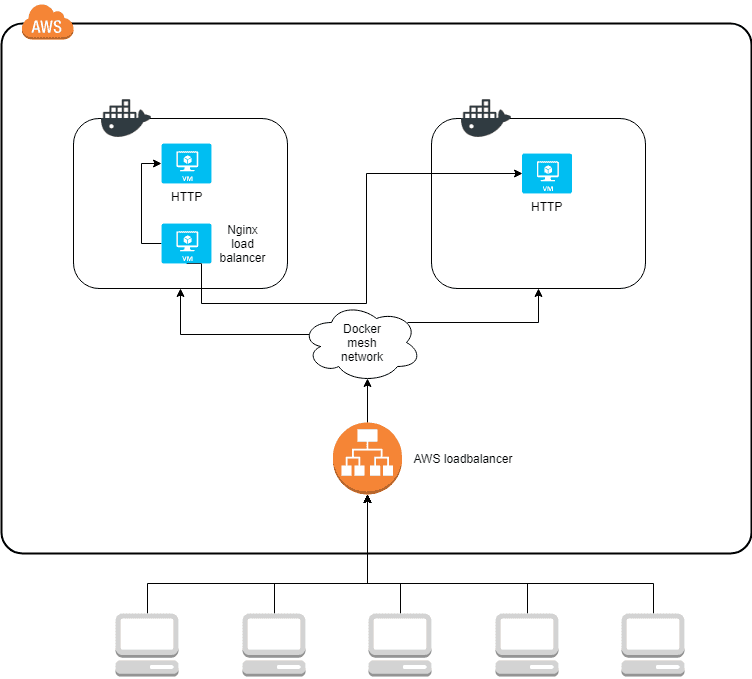
Here all traffic enters the AWS load balancer which knows about both of the Docker hosts and distributes traffic to both of them. Docker expands a mesh network across all nodes in the same service stack. It has the effect that no matter which Docker host gets the traffic, it is automatically routed to the correct container, even if the container is located on a different host.
It allows the Nginx load balancer to run on any of the nodes. If it’s Docker host goes down, it will automatically restart on the other Docker host and continue processing traffic.
Setting up AWS network load balancer
Using the wizard in the AWS console, it is easy to set up. A load balancer consists of two concepts, a target group, and a listener.
A listener consists of a TCP port, for example, 80 for HTTP traffic and 443 for HTTPS traffic. Each listener sends traffic to a target group.
A target group consists of a list of instances that are available for accepting traffic.
That is the setup. When traffic hits the load balancer on a port it is listening to; it will route the traffic into the matching target group. From here the traffic is balanced between the available instances.
The load balancer also supports health checks on the instances, so traffic is only routed to instances that are up.
The wizard looks like this:
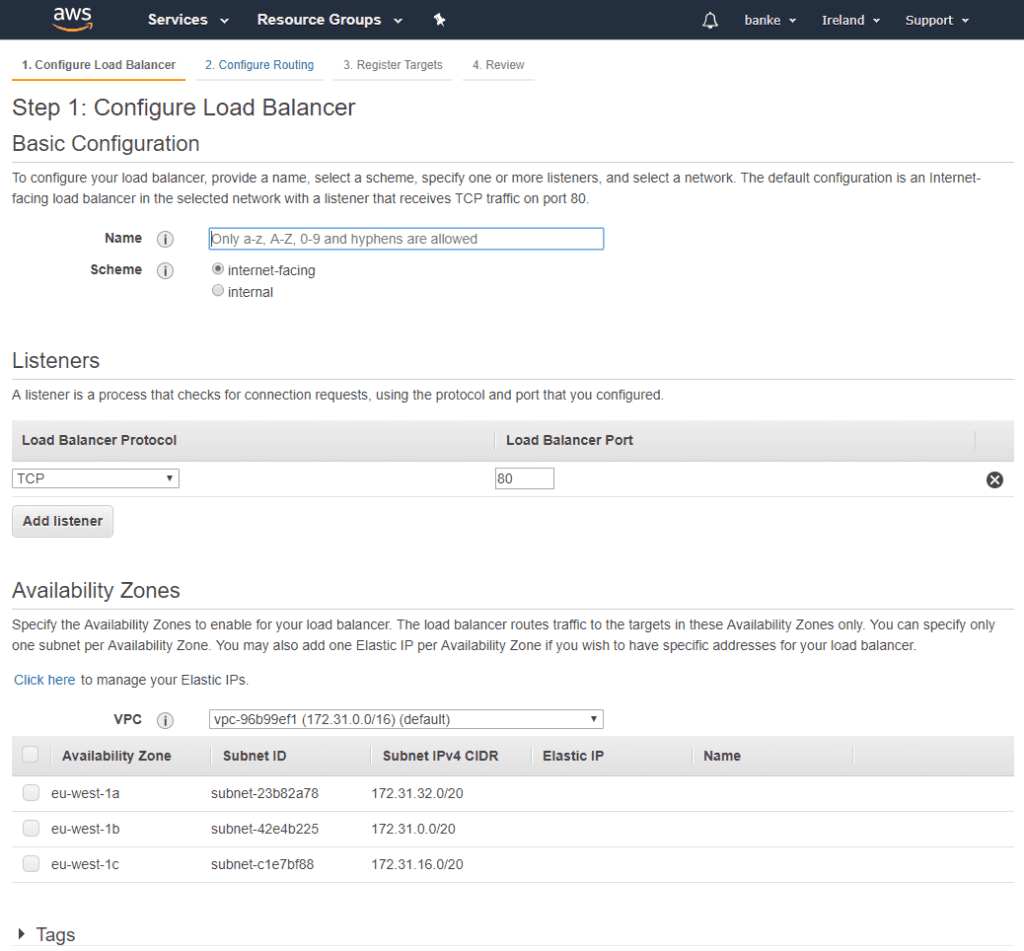
First, select if the load balancer should be public to the internet or internal. In this setup, an internet-facing is needed.
Next step is to select which TCP ports to listen to, 80 for HTTP and 443 for HTTPS traffic.
Finally, we need to select an availability zone. In my case, the hosts are located in “eu-west-1c”.
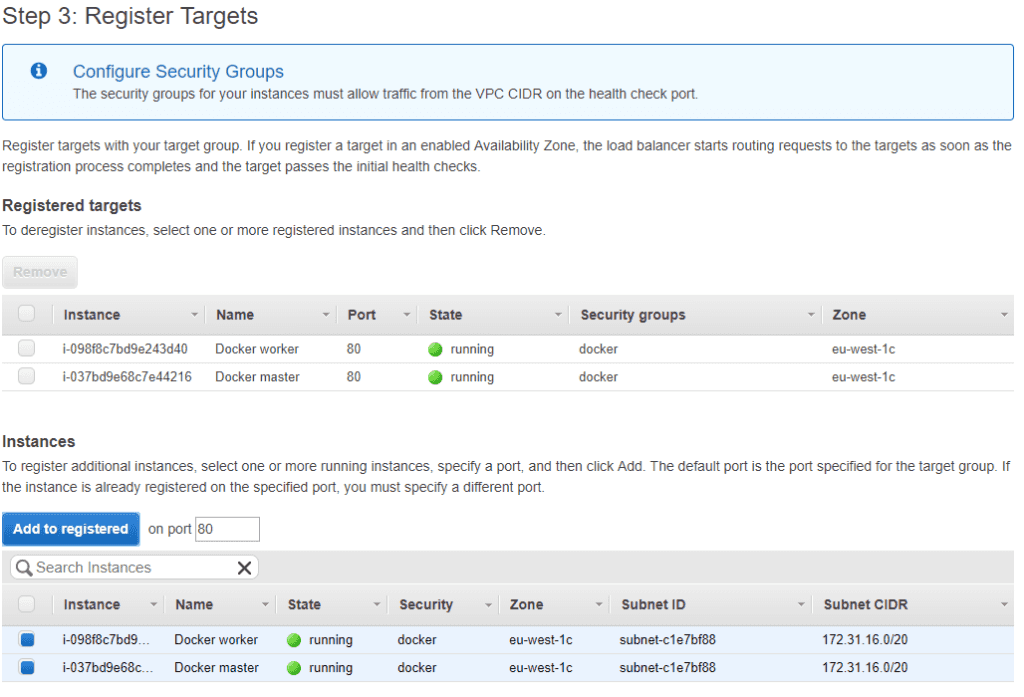
Then we need to add the targets. We can select the ec2 instances to handle the traffic.
That’s it! Now any traffic hitting the load balancer will automatically be balanced between the ec2 instances. I had no problems while setting it up.
Moving from a domain without www to, with www
To allow for better uptime Amazon does not reserve a specific IP address to their load balancer. Instead, they provide a DNS name that we can point to using a CNAME record.
The problem is that this website was running on “datadriven-investment.com,” but it is not possible, in most cases, to use a CNAME record on the apex record for a domain. As described here.
It left me with two options.
- Change the domain name to ”www.datadriven-investment.com” and use a CNAME record.
- Use AWS Route 53 which support an ALIAS type on the apex record. It works exactly like a CNAME except it is actually an A record that AWS updates if the CNAME underneath changes.
I ended up implementing both. Changing to use ”www.datadriven-investment.com” allow the setup to be vendor agnostic if I should choose to change hosting partner in the future.
Using an ALIAS record on the apex record allows backward compatibility. If the domain were just changed, any links pointing to “datadriven-investment.com” would break. But I would like to preserve the functionality, so any click on a link is automatically redirected to ”www.datadriven-investment.com”
Moving domain on an HTTPS site
Most DNS services support an automatic redirect system which would allow us to redirect all requests from “datadriven-investment.com” to ”www.datadriven-investment.com.” But unfortunately, this will only work for old school HTTP sites. As soon as there is encryption involved, we must maintain a valid certificate for the redirect to work. It is often not supported by the DNS service.
So we must build and maintain it our selves. I use Let’s Encrypt for my certificates; luckily they support multiple domains in the same certificate file. It makes it much easier to use.
docker run —rm \ —name letsencrypt \ -v “/data/storage/letsencrypt/etc/:/etc/letsencrypt” \ -v “/data/storage/letsencrypt/lib:/var/lib/letsencrypt” \ certbot/certbot certonly -n \ -m ”frederik@patch.dk” \ —agree-tos \ -d www.datadriven-investment.com -d datadriven-investment.com \ —webroot —webroot-path /var/lib/letsencrypt/datadriven-investment.com/ \ —expand
The difference between this command and the command in the previous article is that www.datadriven-investment.com is added along with the “—expand” parameter. It will create a single certificate for both domains.
The Nginx config looks like this. Not very different from the previous setup. Just a separate virtual host for datadriven-investment.com and www.datadriven-investment.com to create the automatic redirect. The first virtual host is for normal HTTP and answers on both domains. It allows Let’s Encrypt to renew the certificates.
upstream datadriven-investment-loadbalance { server http; }
server { listen 8080; server_name www.datadriven-investment.com datadriven-investment.com;
# Rule for legitimate ACME Challenge requests (like /.well-known/acme-challenge/xxxxxxxxx)location ^~ /.well-known/acme-challenge/ {# No HTTP authenticationallow all;# Set correct content type. According to this:# https://community.letsencrypt.org/t/using-the-webroot-domain-verification-method/1445/29# Current specification requires "text/plain" or no content header at all.# It seems that "text/plain" is a safe option.default\_type "text/plain";# Change document root: this path will be given to certbot as the# \`-w\` param of the webroot plugin.root /var/lib/letsencrypt/datadriven-investment.com;}# Hide /acme-challenge subdirectory and return 404 on all requests.# It is somewhat more secure than letting Nginx return 403.# Ending slash is important!location = /.well-known/acme-challenge/ {return 404;}# redirect from http to httpslocation / {return 301 https://www.datadriven-investment.com$request\_uri;}
}
server { listen 443 ssl http2; server_name www.datadriven-investment.com; ssl_certificate /etc/letsencrypt/live/datadriven-investment.com/fullchain.pem; ssl_certificate_key /etc/letsencrypt/live/datadriven-investment.com/privkey.pem; ssl_protocols TLSv1 TLSv1.1 TLSv1.2; ssl_ciphers “EECDH+ECDSA+AESGCM EECDH+aRSA+AESGCM EECDH+ECDSA+SHA384 EECDH+ECDSA+SHA256 EECDH+aRSA+SHA384 EECDH+aRSA+SHA256 EECDH+aRSA+RC4 EECDH EDH+aRSA RC4 !aNULL !eNULL !LOW !3DES !MD5 !EXP !PSK !SRP !DSS !MEDIUM”; ssl_prefer_server_ciphers on;
location / { proxy_set_header Host $host; proxy_set_header X-Forwarded-For $remote_addr; proxy_set_header X-Forwarded-Proto $scheme; proxy_send_timeout 90s; proxy_read_timeout 90s; proxy_pass http://datadriven-investment-loadbalance;
proxy\_cache my\_cache;add\_header X-Proxy-Cache $upstream\_cache\_status;
}
No acme ACME Challenge stuff here: Let’s Encrypt API uses HTTP for validation
}
server { listen 443 ssl http2; server_name datadriven-investment.com; ssl_certificate /etc/letsencrypt/live/datadriven-investment.com/fullchain.pem; ssl_certificate_key /etc/letsencrypt/live/datadriven-investment.com/privkey.pem; ssl_protocols TLSv1 TLSv1.1 TLSv1.2; ssl_ciphers “EECDH+ECDSA+AESGCM EECDH+aRSA+AESGCM EECDH+ECDSA+SHA384 EECDH+ECDSA+SHA256 EECDH+aRSA+SHA384 EECDH+aRSA+SHA256 EECDH+aRSA+RC4 EECDH EDH+aRSA RC4 !aNULL !eNULL !LOW !3DES !MD5 !EXP !PSK !SRP !DSS !MEDIUM”; ssl_prefer_server_ciphers on;
redirect from http to https
location / {return 301 https://www.datadriven-investment.com$request\_uri;}
No acme ACME Challenge stuff here: Let’s Encrypt API uses HTTP for validation
}
Tags
Share

Related Posts
Legal Stuff