


Table Of Contents
To learn more about how and why OAuth 2 works the way it does, I took part in a workshop hosted by curity.io as part of the Nordic APIS summit 2018. The workshop covered the basics of OAuth 2 and OpenID Connect. I have worked a little bit with OAuth 2 before so I knew the basics, but the workshop helped me gain a better understanding of the protocol and the different parts of it.
I have tried to describe the learnings I had from the workshop here both for my reference and it might help others understand OAuth 2 better.

The first important point to acknowledge is that OAuth 2 is designed to solve one use case, which is not authentification as the name suggests. Instead, it solves this problem: A user has access to a resource and want to allow a third party to have the same access.
In the “old days” this could be solved by the third party saving the username and password of the user, which would allow the third party to impersonate the user when accessing the resource.
But that is less than optimal because of two points; if the user changes the password, all third parties lose access. And if the user wants to revoke the access, this can not be done without changing the password.
OAuth 2 to the rescue
The standard has many different parts which make understanding it quite complicated. Much of the specification is also unimportant for most use cases, but it clouds the understanding that the specification is so large. It is not that the concepts are that difficult when explained, but there are many places where it is easy to trip over the details.
Firstly, OAuth defines four different actors. That is persons or systems that have a specific role to play when a user delegates access to a resource to a third party.
- We have the user who is typically a real person, in OAuth jargon, this is the resource owner (RO)
- Then we have the resource, that would usually be an API, in OAuth jargon: Resource Server (RS)
- There is also the third party; this could be a mobile app, a website or another system that needs to access the resource, in OAuth jargon: the client
- Finally, there is the OAuth server, in OAuth jargon: the authorization server (AS)
Since OAuth does not do authentication most OAuth systems have or integrate with some kind of authentication service. Because we usually need to validate that the user is who they say they are.
OAuth grant flow(s)
The four actors need a protocol to communicate with each other securely, to allow access to be delegated. The protocols are called “flows” in OAuth 2.
Since different applications have different requirements, there are four different flows or protocols for how the actors communicate. Because why make one flow if we can make many :-) The largest flows are authorization code flow and implicit flow. I will only cover the code flow; the other flows are simpler so they should be easier to understand.
Authorization Code Flow
If possible this is the flow to use; it is the most secure of the four flows. It should be well known from Google login, Facebook login and other login systems where you can log in to a third party website using your existing profile.
The protocol is shown here and requires a few more terms to explain. Each arrow signals an HTTP request or response.
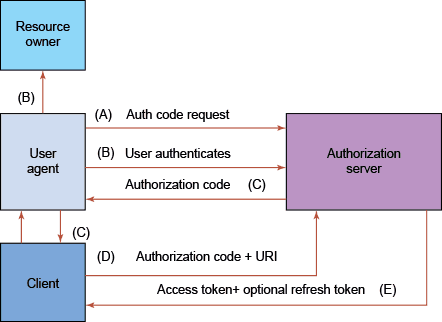
As explained in the section above about actors, there is a client. A client consists of two parts, a public, and a private part. Shown here as “User-agent” and “Client.” Think of the User agent as the user’s browser, and the Client as a backend part hosted on a server. Why that is needed will be apparent later.
The flow consists of 6 steps A-E, in the final step an access token and refresh token is provided to the client. It is the access token that can be used to access the protected resource, not shown in the image.
A. First, the User-agent queries the AS for an authentication code
With a simple GET request, the AS is notified that we want to request access to a resource.
https://oauthserver/authorize?client_id=awesomeclient&response_type=code&scope=read&redirect_uri=https://awesomeaplication.com/callback
The client_id is an is that is registered with the AS when the client was set up. It is always the same across all requests and all users.
response_type=code signals to the AS which protocol/flow we want to use.
scope=read is a list of all the different scopes we wish to request access to. A scope is a name which the AS and the RS agree on, and it has specific meaning for the RS. For a CRUD API, there could be scopes for each operation type so a user could grant the client access to read but not to write.
redirect_uri is where the user agent is redirected after the authorization code is granted. This URI is often validated against a predefined list in the AS, making it essentially the same URI every time.
B. Authenticating the user
Since neither the AS nor the User-agent knows who the user is, a redirect to the authentication service is made. How this authenticating happens is not a part of the OAuth protocol and is up to the implementation of the service.
Usually, the user is presented with a login screen from the authentication service along with a list of the scopes. Here the user can allow or deny access to the different scopes. A well-known example of this is when a Facebook application wants access to your friend list, post on your wall and so on. Each of the types could be a scope that the user can allow or deny access.
When the user is authenticated the AS is signaled by the authentication service with user information.
C. Getting the grant code to the user agent
Next step is that the AS sends the authorization code back to the User-agent as part of the registered redirecturi. The code is transmitted as a GET parameter with the name _code. It will look similar to this:
https://awesomeapplication.com/callback?code=<random code>
The code is a onetime use code. It is used to request the AS for access tokens.
D. Getting authorization code
The reason for splitting the client into two parts(User agent and client) is security. The user agent could be a JavaScript application meaning that all its parts are public. But to get the access token from the AS we need a secret that is shared between the AS and the client, to allow the AS to validate that it is the true client it is communicating with. But the secret cannot be hosted in a public client that can be decompiled by anyone.
Instead, the authorization code is passed down to the backend, the client. And here we can store our secret away from snoops.
E. Getting the access token
Finally, the client(backend) can use the authorization code to request an access token from the AS. The client will request using the following URI:
https://oauthserver/token?client_id=awesomebackend&client_secret=123&grant_type=authorization_code&code=<the authorization code>
A thing to notice is that the client_id is different in the backend compared to the frontend. It is not a requirement but will make the flow more secure.
The response from the AS is a JSON string with an access_token and optionally, a refresh_token.
Using the tokens
The interesting part is of course to call the APIs we need, not authorization. Strangely enough when I read about OAuth this part is usually omitted for some reason.
The flow ends with the client having an access token that is just a random string provided by the AS. It does not have any meaning by itself.
It is used when requesting resources from the RS. The token is added as a Bearer token header on each request like this:
Authorization: Bearer <access_token>
When the API receives the access token it needs to validate it, this is done using a process called introspection, which just means that the RS calls the AS and asks if the token is valid. If the token is not valid the response is just the JSON string { “active”: “false” }
But if it is active, the response is a JSON string showing the client_id, scope, and expiration time. Enough information for the API to validate the request and grant access.
How does a real OAuth session look like
Puh that was quite a write-up. It seems very complicated but let us try to break it down to the actual HTTP calls.
For this demo, I have used Googles OAuth server. It requires a project created in their API console. The flow is also described here.
The first request tells Google looks like this:

- client_id is obtained from when the project was created
- redirect_uri must match the URI created in the project
- scope must be a valid scope from Googles list of scopes
- response_type is set to code since it is a code flow we want.
Since the user is not authenticated the first window that is shown is the login prompt.
When I sign in Google asks me if I want to allow the application to access the requested scope.
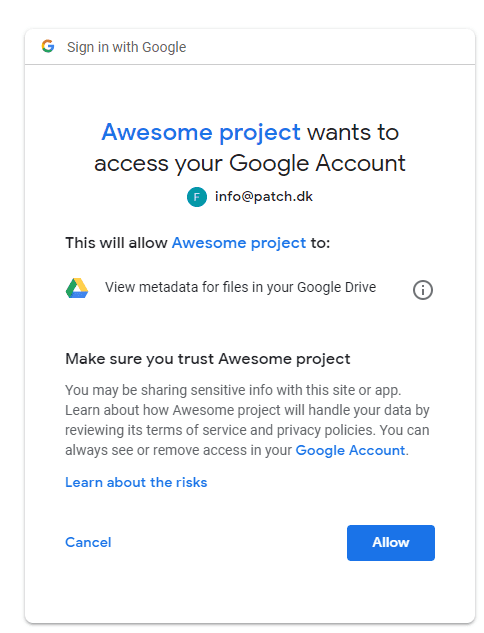
When I accept that, the browser is redirected to the URL
http://localhost:54000/?code=4/gABji6OhsRkhZyvey8TX\_BMrQBV9mWkFYGZKm9jYf06u8BE-Vhxs9f0dhpQqH3aZq9ySCBzmz9B2p7QF4blvsdE&scope=https://www.googleapis.com/auth/drive.metadata.readonly
The URL is the redirect_uri defined above with the authorization code appended.
The authorization code is used to request the access_token like this:
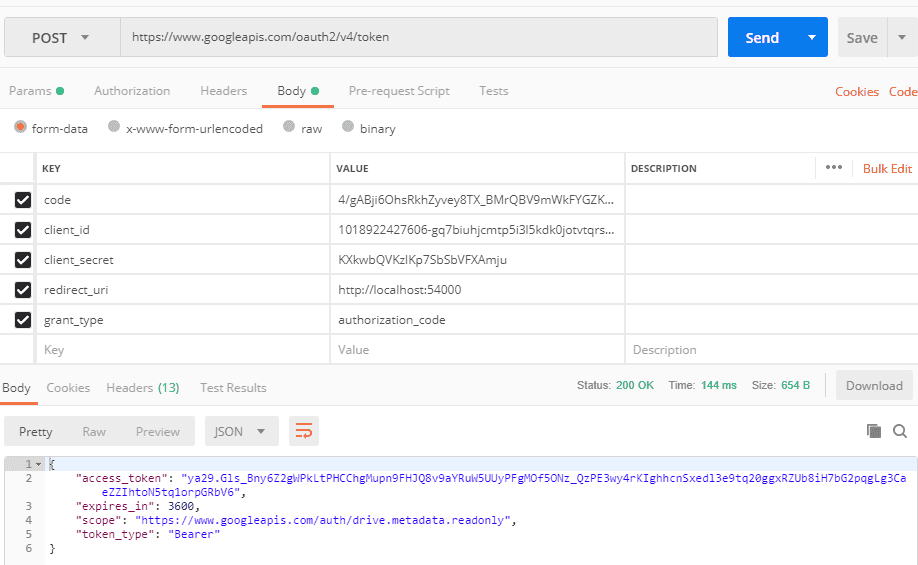
The endpoint returns an access_token that we can use to query Googles APIs. We can not introspect the token directly, that is done inside Googles APIs when we make a request to them.
Access token and refresh token
An access token is usually short-lived, like 5-10 minutes. When it expires, the refresh token which is much longer lived can be used to request a new access token from the AS. It is done through the /token endpoint on the AS.
When a refresh happens a new access token, and a new refresh token is given, replacing the old tokens.
Revoking rights
If we revoke an access token, that particular token will be invalidated, and all requests with that token will be denied.
But if the client still has a refresh token, it can be used to request a new access token without any problem.
But if the refresh token is invalidated all the access tokes associated with the refresh token is invalidated, which is usually what we want.
OAuth provides an endpoint to do revoking, allowing the application to have a button where the user can withdraw access. But usually, I think this is done by the user directly in the AS which should provide a UI for it.
OpenID Connect
OAuth 2 only does delegate access, but identification/authorization is needed as well. To support this use case OpenID connect builds on top of OAuth 2.
When using OAuth 2, all tokens are just random strings which do not tell us anything about the user. Only when the resource API, in the end, asks the AS if the token is valid information about the user is given.
In modern web application, we would like to show a “Welcome xxx” to the user at least, so it is customized. But since the token is just a random string, it will be difficult to support this use case.
If the AS supports OpenID connect the scope openid can be added to the initial request which triggers a new token to be enabled, the id_token.
JSON Web Tokens (JWT)
An id_token is a signed and base64 encoded string, when decoded it contains the following information:
{"sub" : "alice","iss" : "https://openid.c2id.com","aud" : "client-12345","nonce" : "n-0S6_WzA2Mj","auth_time" : 1311280969,"acr" : "c2id.loa.hisec","iat" : 1311280970,"exp" : 1311281970}
The token is signed by the AS and using a public key each client can verify that the token is valid. It makes it redundant to introspect the token to get the information, decreasing the load on the AS.
The id_token is only part of the response when the user is involved, never during a refresh request.
Each OpenID Connect server must answer on the endpoint /.well-known/openid-configuration as Google do. The JSON response contains information about all the OAuth 2 endpoints needed for the flows and a list of how to get the encryption keys to validate the id_tokens.
What to be aware of in a real setup
When a setup grows with many different APIs, we get many introspection requests to the AS. The number of queries can overwhelm the AS and cause it to become a bottleneck.
One way to avoid this is to implement a cache as a reverse proxy in front of the APIs. This reverse proxy introspects each token only once and stores the reply as a JWT. This JWT can then be sent instead of the access_token to the APIs, and with this setup, each API do not need to query the AS.
This article has only just scratched the surface of OAuth 2 / OpenID Connect, but I hope it gives an overview of how the technology works.
Share

Related Posts
Legal Stuff